

As a supplier of One Rotor Screw Pumps, I understand the importance of proper maintenance and cleaning for these essential pieces of equipment. A well - maintained One Rotor Screw Pump not only ensures efficient operation but also extends its service life. In this blog, I'll guide you through the process of cleaning a One Rotor Screw Pump, sharing some professional tips and best practices.
1. Preparation
Before you start cleaning the One Rotor Screw Pump, it's crucial to take some preparatory steps to ensure safety and efficiency.
Safety First
First and foremost, make sure the pump is completely shut down and disconnected from the power source. This prevents any accidental starts that could lead to serious injuries. Wear appropriate personal protective equipment (PPE), including safety goggles, gloves, and a protective apron. The fluids and debris inside the pump can be harmful to your skin and eyes, so proper protection is a must.
Gather Tools and Cleaning Agents
You'll need a set of basic tools such as wrenches, screwdrivers, and a soft - bristle brush. For cleaning agents, choose a mild detergent or a specialized pump cleaner that is compatible with the materials of the pump. Avoid using abrasive or corrosive chemicals that could damage the pump components. You may also need a container to collect the drained fluids and a clean cloth for wiping.
Review the Manual
Refer to the manufacturer's manual for your One Rotor Screw Pump. The manual provides detailed information about the pump's structure, disassembly steps, and recommended cleaning procedures. It also contains important safety instructions specific to your pump model.
2. Disassembly
Once you've completed the preparation, it's time to disassemble the One Rotor Screw Pump.
Drain the Fluid
Locate the drain plug on the pump housing and place a suitable container beneath it. Open the drain plug and allow all the fluid inside the pump to drain completely. This fluid may contain contaminants, so handle it according to local environmental regulations.
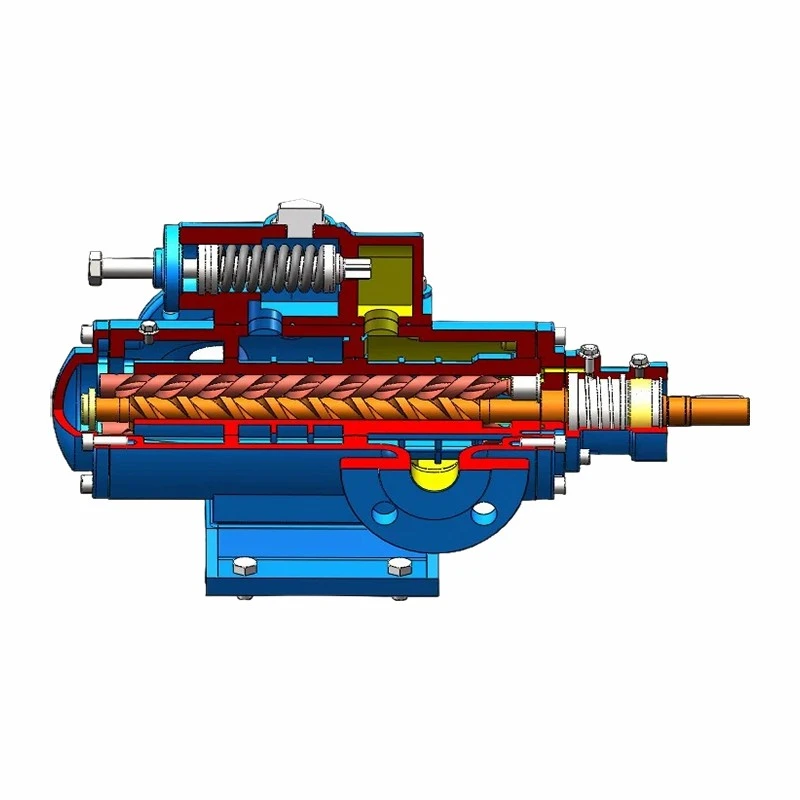

Remove the Housing
Using the appropriate wrenches, carefully remove the bolts that hold the pump housing together. Keep the bolts in a safe place to avoid losing them. Gently separate the housing sections, being careful not to damage any gaskets or seals.
Take Out the Rotor and Other Components
Once the housing is removed, you can access the rotor and other internal components. Carefully lift out the rotor, taking note of its orientation and the way it fits into the pump. Also, remove any other parts such as bearings, seals, and valves. Place all the components on a clean, flat surface.
3. Cleaning the Components
After disassembly, each component needs to be cleaned thoroughly.
Cleaning the Rotor
The rotor is the heart of the One Rotor Screw Pump, and it requires special attention. Immerse the rotor in a container filled with the cleaning agent. Use a soft - bristle brush to gently scrub the surface of the rotor, removing any dirt, debris, or build - up. Pay close attention to the screw threads, as these areas can trap contaminants. Rinse the rotor with clean water and dry it with a clean cloth.
Cleaning the Housing
Clean the inside of the pump housing using the same cleaning agent. Use the brush to scrub the walls, corners, and any other areas where dirt may accumulate. Rinse the housing thoroughly to remove all traces of the cleaning agent. Check the housing for any signs of damage or wear, such as cracks or corrosion.
Cleaning Other Components
Clean the bearings, seals, and valves in a similar manner. For bearings, use a bearing cleaner if necessary, and make sure they are completely dry before reassembly. Inspect the seals for any signs of damage and replace them if needed. Valves should be checked for proper operation and cleaned to ensure smooth flow.
4. Inspection
While cleaning, it's a good opportunity to inspect the components for any signs of wear or damage.
Checking the Rotor
Examine the rotor for any signs of wear on the screw threads. If the threads are worn beyond the acceptable limit, the rotor may need to be replaced. Also, check for any cracks or deformations in the rotor.
Inspecting the Housing
Look for any signs of corrosion, pitting, or damage to the housing. Check the mating surfaces for flatness and smoothness. If there are any issues with the housing, it may affect the pump's performance and sealing.
Evaluating Other Components
Inspect the bearings for proper rotation and any signs of damage. Check the seals for leaks and the valves for proper opening and closing. Replace any components that are worn, damaged, or not functioning properly.
5. Reassembly
After cleaning and inspection, it's time to reassemble the One Rotor Screw Pump.
Install the Components
Start by installing the cleaned components back into the pump housing. Begin with the bearings and seals, making sure they are properly seated. Insert the rotor into the pump, following the correct orientation. Reinstall any other parts such as valves.
Replace Gaskets and Seals
Replace any gaskets or seals that were removed during disassembly. Apply a thin layer of gasket sealant if recommended by the manufacturer. This helps to ensure a proper seal and prevent leaks.
Reattach the Housing
Carefully align the housing sections and reattach them using the bolts. Tighten the bolts evenly to the recommended torque specification. Over - tightening can damage the housing, while under - tightening can lead to leaks.
6. Testing
Once the pump is reassembled, it needs to be tested to ensure it is working properly.
Refill the Fluid
Fill the pump with the appropriate fluid according to the manufacturer's recommendations. Make sure the fluid level is correct.
Reconnect the Power
Reconnect the pump to the power source and turn it on. Listen for any unusual noises or vibrations, which could indicate a problem with the assembly. Check for any leaks around the housing or connections.
Monitor the Performance
Run the pump for a few minutes and monitor its performance. Check the flow rate, pressure, and temperature to ensure they are within the normal operating range. If you notice any issues, stop the pump immediately and troubleshoot the problem.
Conclusion
Cleaning a One Rotor Screw Pump is a detailed process that requires careful preparation, disassembly, cleaning, inspection, reassembly, and testing. By following these steps, you can keep your pump in good working condition and extend its service life.
If you are in the market for a high - quality One Rotor Screw Pump or need more information about pump maintenance, feel free to reach out to us. We are a reliable supplier of One Rotor Screw Pump and can provide you with the best products and professional advice. We also offer Two Rotor Screw Pump and Three Rotor Screw Pump for different application needs. Contact us for procurement discussions and let us help you find the perfect pump solution for your business.
References
- Manufacturer's manual of One Rotor Screw Pump
- Industry standards for pump maintenance and cleaning